
As I mentioned in different articles and in the About page, this website is being built using a static site generator, namely nanoc. Every time I push changes to the code repo – be it configuration changes, new or updated articles, etc –, a new build is triggered on Netlify and the new version of the site is deployed. This is all well and good, except that on some occasions, it would be nice to be able to schedule new articles to come up on the site on a specific day, without having to manually push the content only then. In the last few days, I spent some time to see how this could be done and this post will look into the solution that I put in place using Google Cloud Platform (GCP).
Update the logic in nanoc when building the website
The first thing to do is to make sure that nanoc does not build articles that are scheduled to be published later. This way, we can commit the changes to git and push them to the repository, but the new article will be excluded from the build on Netlify.
Initially, the Rules file preprocess block was containing the following rule:
1
2
# Delete unpublished articles
@items.delete_if { |item| item[:publish] == false }
This rule allowed me to exclude some articles that are still in draft from being processed and built into the site. In order to schedule articles, it is necessary to update the logic a bit so that we also look at the article created_at attribute: if it is in the future, we do not include it in the build. The updated rules are as follow:
1
2
3
4
# Delete unpublished articles
@items.delete_if do |item|
(item[:created_at] > Date.today if item[:created_at]) || (item[:publish] == false)
end
Architecture
Before diving into the details, and as with all projects, there are different ways of achieving the same things. I looked a bit around to see if other people faced the same issue and what their solutions were and there are actually quite a few options out there. Most of them are related to code being hosted on Github and using GitHub native tools though, so those were not necessarily an option for me since my own repository is hosted on Bitbucket. Bitbucket comes with Pipelines that allows automating CI/CD and maybe it could have been an option to look into but the truth is I wanted to get my hands dirty and try to create a Cloud Function in Ruby running on GCP. So here comes the overall architecture:
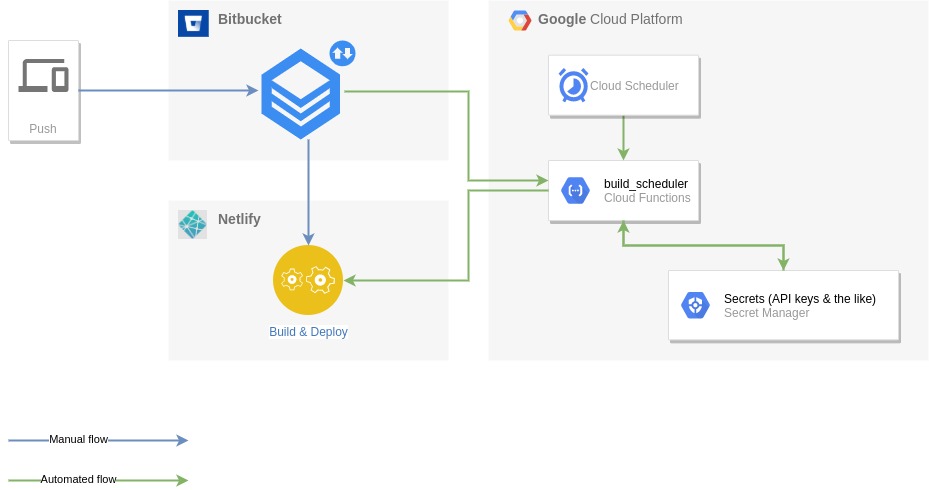
The basic idea is to use Cloud Scheduler to trigger a Cloud Function on a daily basis. This function will clone the code from the (private so far) Bitbucket repository, it will fetch the last date at which Netlify made a deployment of the site and it will assess if there are any articles that are due to be published. If this is the case, then the function will call a Build Hook from Netlify for the website so that a new build is triggered and the website gets updated. That’s it, pretty simple.
Set up
Since we are using GCP, the first step was to create a new project and enable the necessary APIs (Cloud Functions API, Secret Manager API and Cloud Build API). At this time, a number of steps have been executed manually on the GCP console. I believe that most of them could have been done through scripting, using the glcoud SDK but this will be an exercise for later.
Interacting with Bitbucket and Netlify means that there are a few secret variables that the function will need to connect to them. For this purpose, we use Google Secret Manager. Once again, the variables here were created from the GCP Console but this could have been done using the SDK or code. This is outside of the scope of this quick project.
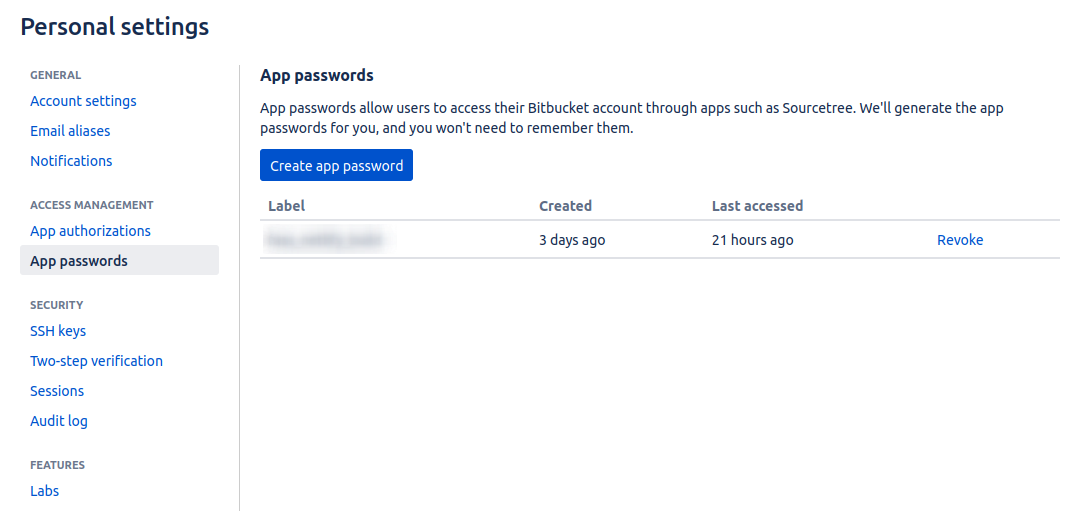
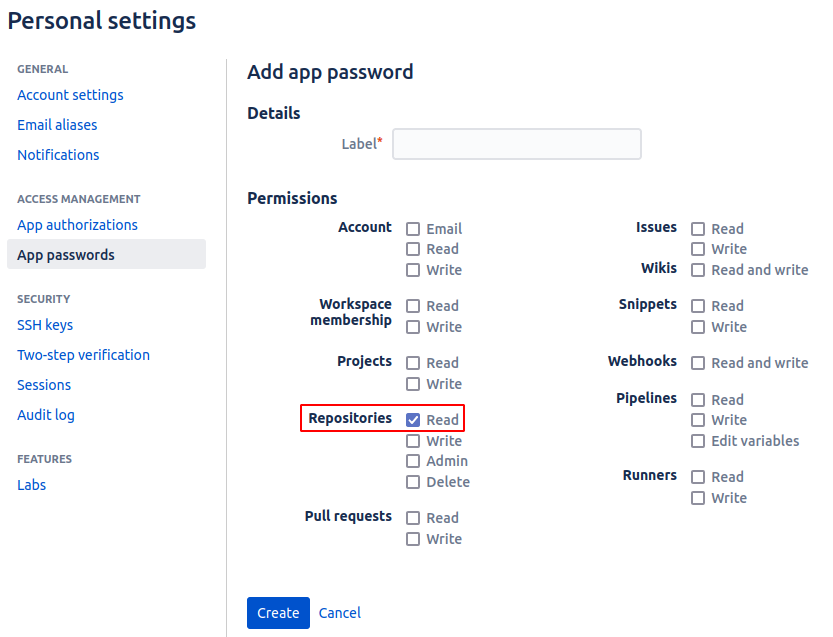
Create an App password in Bitbucket
This can be done from the global settings and is one option to conveniently have read access to the repository that we are interested in. Note that this is a global setting, meaning that if we give it read access to repositories, this grants read access to all repositories. There are probably options that are repo specific (using SSH keys for instance) but for convenience and ease of setup I went with the app password.
Create an access token in Netlify
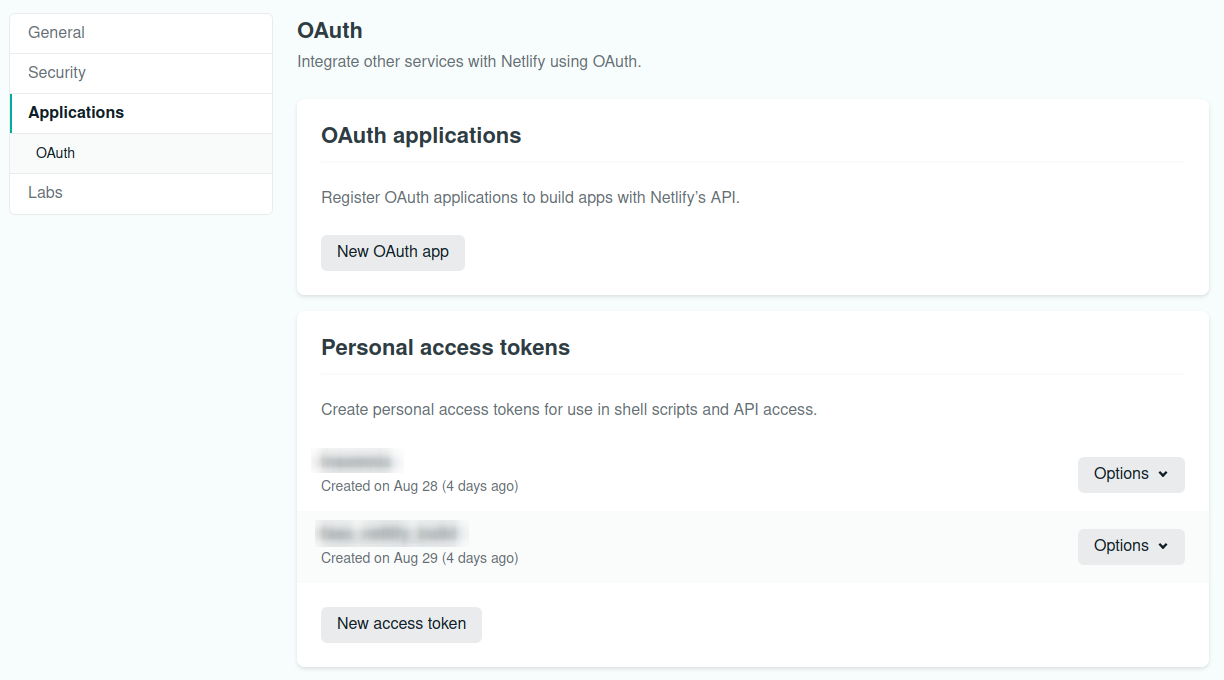
It is also possible to create a personal access token to connect to Netlify. This is all explained in their doc and can be done from the global settings > Applications.
Fetch the site ID in Netlify
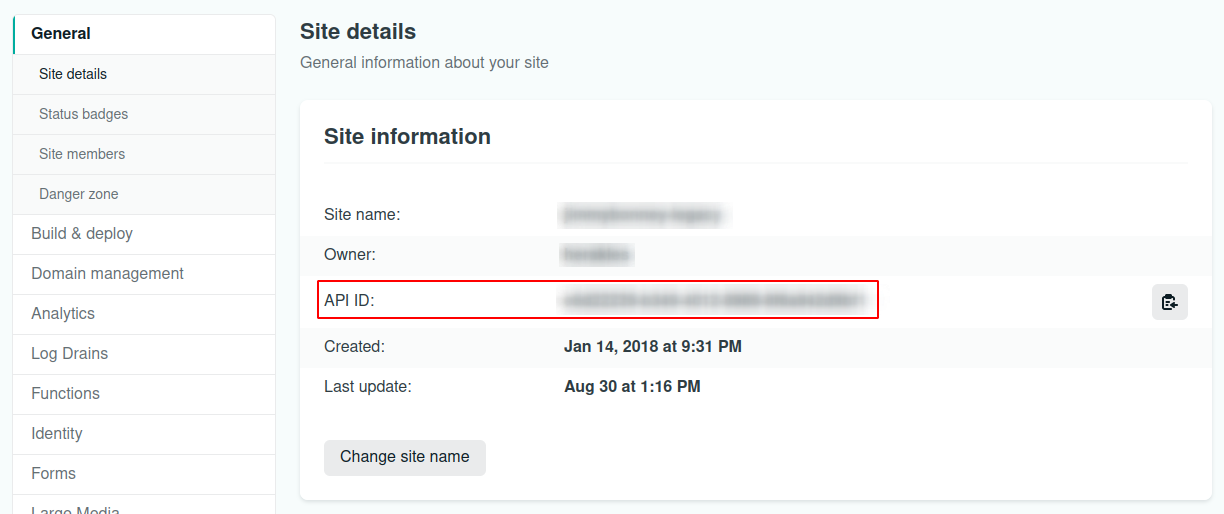
In order to get the list of deployments for a given site, we need the site ID from Netlify. This is accessible either through the API or from the UI, in the Site settings section.
Generate a build hook in Netlify
Finally, in order to generate a new build if needed, there are different possible approaches: one is of course to use the API (in the same way we fetch the deployment date) and another is to use a webhook. In this specific case, I went with the webhook since the netlify gem available does not include the build api calls.

Save secret in Secret Manager
Once all this data is gathered, it can be safely stored away in GCP Secret Manager.
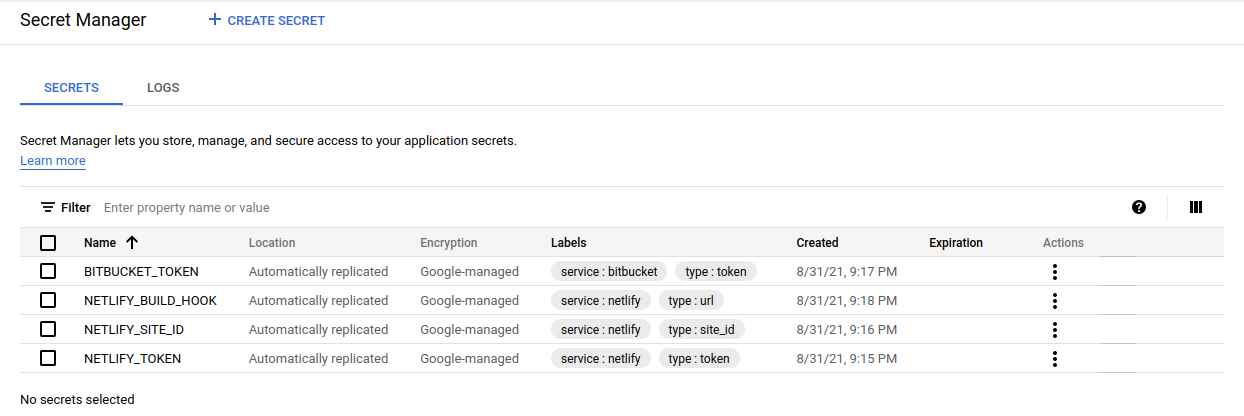
Do make sure to grant the service account that will run the cloud function the rights to access secrets in Secret Manager. If using the default App Engine service account (not recommended for production as per Google’s guidelines), this is how it is done.

You can read more about it on Google documentation and forgetting to do this is a pretty common issue that generated a number of articles (for instance here) or question on StackOverflow (for instance here).
Cloud Function
Once all this is in place, we can go ahead and code the logic. To keep things together, I created a simple class Reviewer that has the necessary logic to connect to those services and identify if a new build needs to be triggered. This class is in turn called by the Cloud Function. To consult the whole code, head to the public repo.
1
2
3
4
5
6
7
8
9
10
11
12
13
14
15
16
17
18
19
20
21
22
23
24
25
26
27
28
29
30
31
32
33
34
35
36
37
38
39
40
41
42
43
44
45
46
47
48
49
50
51
52
53
54
55
56
57
58
59
60
61
62
63
64
65
66
67
68
69
70
71
72
73
74
75
76
77
78
79
80
81
82
83
84
85
86
87
88
89
90
91
92
require 'netlify'
require 'git'
require 'front_matter_parser'
require 'faraday'
require 'fileutils'
module FaasNetlifyBuild
class Reviewer
# Constructor
#
# @params args [Hash] the secrets from Bitbucket and Netlify (:bitbucket_token, :netlify_token, :netlify_site_id, :netlify_build_hook)
def initialize(args)
@bitbucket_token = args[:bitbucket_token]
@netlify_token = args[:netlify_token]
@netlify_site_id = args[:netlify_site_id]
@netlify_build_hook = args[:netlify_build_hook]
@tmp_location = args[:config]["TMP_FOLDER"]
end
# Logic to be executed to validate if a new build is required
def run
output = "No new build was needed..."
checkout_code
if new_build_needed?
trigger_build
output = "New build was triggered"
end
output
end
# Clone the git repository in a local folder
def checkout_code
p "Cloning repository..."
# Delete the directory if it already exists
FileUtils.rm_rf(@tmp_location)
# Clone the repo in the tmp folder
g = Git.clone("https://jbonney:#{@bitbucket_token}@bitbucket.org/jbonney/jimmybonney.com.git", @tmp_location)
end
# Check if a new build is needed. A new build is needed if:
# 1. There is at least one article that has a publication date set to today or in the past and
# 2. The last deployment date from Netlify is older than the article publication date
#
# @return [Boolean] true if a new build is needed, false otherwise
def new_build_needed?
p "Validating if a new build is needed..."
last_deployment = last_deployment_date
current_year = Date.today.year
new_build_needed = false
# Initiate the loader for front_matter_parser to allow dates
loader = FrontMatterParser::Loader::Yaml.new(allowlist_classes: [Date])
# Articles are sorted per year, in the folder 'content/articles/[YEAR]'
Dir.glob("#{@tmp_location}/content/articles/#{current_year}/*.md") do |file|
parsed = FrontMatterParser::Parser.parse_file(file, loader: loader)
p "Analyzing article #{parsed['title']}"
# If article explicitly set the publish flag to false, then don't do anything, move on to the next file
next if parsed['publish'] == false
# New build is needed if:
# 1. the article created_at date is in the past AND
# 2. the last deployment took place before the article created_at date
new_build_needed = true if parsed['created_at'] > last_deployment && parsed['created_at'] <= Date.today
end
p "New build needed: #{new_build_needed}"
new_build_needed
end
# Trigger the webhook from Netlify to start a new build
def trigger_build
p "Triggering the build..."
response = Faraday.post(@netlify_build_hook) do |req|
req.params['trigger_title'] = "Triggered automatically from Ruby script using webhook"
end
# TODO: handle errors in the response
end
# Fetch the last date at which a deployment took place
#
# @return [Date] last deployment date
def last_deployment_date
p "Checking last deployment date..."
# Connect to Netlify
netlify_client = Netlify::Client.new(:access_token => @netlify_token)
# Get the correct site (i.e. jimmybonney.com)
site = netlify_client.sites.get(@netlify_site_id)
# The Netlify API sort deploys from most recent to oldest => first element is the most recent deployment
last_deploy = site.deploys.all.first
last_deploy_timestamp = last_deploy.attributes[:created_at]
DateTime.parse(last_deploy_timestamp).to_date
end
end
end
1
2
3
4
5
6
7
8
9
10
11
12
13
14
15
16
17
18
19
20
21
22
23
24
25
26
27
28
29
30
31
32
33
34
35
36
37
38
39
40
41
42
43
44
45
46
47
48
49
50
51
52
53
54
55
56
57
58
59
60
61
62
63
64
65
66
67
require "functions_framework"
require "google/cloud/secret_manager"
require "yaml"
require "./reviewer"
# Use Google Cloud Secret Manager client to decode a secret
#
# @param client [Google::Cloud::SecretManager] the Google Cloud Secret Manager client
# @param secret_name [String] full path of secret to decode]
def extract_secret(client, secret_name)
secret = client.access_secret_version name: secret_name
secret.payload.data
end
# Fetch the secret, either from the file system if the secret is mounted as a file,
# or through a secret manager client otherwise
#
# @param secret_file [String] the path to the secret when it is mounted
# @param secret_manager_client [Google::Cloud::SecretManager] secret manager client
# @param secret_arn [String] the full secret identifier, including project number, name and version
# @return [String] the secret
def fetch_secret(secret_file, secret_manager_client, secret_arn)
return File.read(secret_file) if File.exist?(secret_file)
extract_secret(secret_manager_client, secret_arn)
end
# Load configuration file .env.yaml
config = YAML::load_file(File.join(__dir__, '.env.yml'))
# Entry point for the Cloud Function
#
# Read the relevant secrets and then initiate and run a Reviewer instance
FunctionsFramework.http "build_scheduler" do |request|
# In the local environment, the json key should be present to allow us to read secrets from Secret Manager
# This file is not commited (part of .gitignore, and therefore not sent to GCP either)
if File.exist?('.credentials/secret_manager_secret_accessor.json')
# Read the key only if it is not set from the environment already.
ENV["GOOGLE_APPLICATION_CREDENTIALS"] ||= ".credentials/secret_manager_secret_accessor.json"
end
# Initiate the Secret Manager client, either by using the credentials defined above when this is
# run locally, or the proper credentials will be looked up internally by GCP when this codes run on GCP
client = Google::Cloud::SecretManager.secret_manager_service
# Project ID is either read from the environment variable (usually when running inside GCP),
# or through the config file
project_id = ENV["GCP_PROJECT"] || config["PROJECT_ID"]
# Fetch the different secrets needed
bitbucket_token = fetch_secret(
'/secrets/BITBUCKET_TOKEN', client, "projects/#{project_id}/secrets/BITBUCKET_TOKEN/versions/latest")
netlify_token = fetch_secret(
'/secrets/NETLIFY_TOKEN', client, "projects/#{project_id}/secrets/NETLIFY_TOKEN/versions/latest")
netlify_site_id = fetch_secret(
'/secrets/NETLIFY_SITE_ID', client, "projects/#{project_id}/secrets/NETLIFY_SITE_ID/versions/latest")
netlify_build_hook = fetch_secret(
'/secrets/NETLIFY_BUILD_HOOK', client, "projects/#{project_id}/secrets/NETLIFY_BUILD_HOOK/versions/latest")
reviewer = FaasNetlifyBuild::Reviewer.new(
bitbucket_token: bitbucket_token,
netlify_token: netlify_token,
netlify_site_id: netlify_site_id,
netlify_build_hook: netlify_build_hook,
config: config
)
reviewer.run
end
There are a couple of aspects to consider here:
- GCP is making some changes to make it easier to access secrets from within a Cloud Function. However, those changes are in beta currently and therefore I didn’t get it to work 100% as I would like. In the code above, I have included some logic to either read from a secret that is mounted as file or accessed through a Secret Manager client. The client itself is either instantiated using a json key belonging to a service account having the secret accessor role (when this is done locally) or internally within GCP (GCP then discovers the credentials behind the scenes).
- There are also some other variables that have been added to a config file, such as GCP Project number. Since I am not sure how secret the project number is, the repo contains an example file to be copied locally instead.
Test and Deploy
Test Cloud Function locally
GCP Cloud Functions comes with a framework allowing to test locally without having to deploy to GCP.
1
2
bundle install
bundle exec functions-framework-ruby --target build_scheduler
Simply open a web browser and connect to localhost:8080 by default or from the console curl localhost:8080. If all goes well, then the output should be “No new build was needed…” or “New build was triggered”.
Do note that the script does need internet to run, even for local testing, since it gets the different credentials from Secret Manager, clones the git repo from Bitbucket and fetches deployment data from Netlify.
Deploy to GCP
Once all is well, this can be deployed to GCP
1
gcloud functions deploy build_scheduler --runtime ruby27 --trigger-http --allow-unauthenticated
As mentioned above, GCP is adding support for secrets so that they can be mounted as files or environment variables and therefore not require a full Secret Manager client. I tried to deploy using the beta version below but didn’t get it to work properly. The command is working when I include a single secret, but not with multiples.
1
gcloud beta functions deploy build_scheduler --runtime ruby27 --trigger-http --set-secrets /secrets/BITBUCKET_TOKEN=BITBUCKET_TOKEN:latest,/secrets/NETLIFY_TOKEN=NETLIFY_TOKEN:latest,/secrets/NETLIFY_SITE_ID=NETLIFY_SITE_ID:latest,/secrets/NETLIFY_BUILD_HOOK=NETLIFY_BUILD_HOOK:latest
Set up the scheduler
GCP offers Cloud Scheduler that allows to simply set up cron jobs. In this specific case, we can use the scheduler to trigger a http request to the function that we have just deployed.

Note that when we deployed the function in the previous section, we set the flag --allow_unauthenticated which means that the function can be triggered by anyone having the link. We did this to validate that everything works as expected once the function is deployed. This is however probably not needed long term since the scheduler is invoking the function from within GCP: this should allow us to include some authentication easily and restrict access to who can trigger the function.
Next steps
Here are some things that come to mind in terms of improvements:
- Auto-deploy the function when the code is pushed into the repository, inspired by this article
- Authenticate Cloud Scheduler so that we can remove the public access to the function (see resources below)
- Make this solution more generic so that it can be used by others with minimal changes
- Reflect about how to interact with secrets
Conclusion
As we have seen, adding the possibility to schedule posts / articles is actually quite easy to put in place. I am conscious that my set-up is probably not the most common: nanoc is not the most used static-site generator, Bitbucket is not the most used git repository, and GCP doesn’t have the same footprint as AWS. All this is probably the reason why I had to deploy my own solution in the first place but hopefully it can help or inspire others having their own exotic set-up. One aspect that I didn’t mention is that this overall setup is probably going to run on the free tier offered by Google, meaning that we are adding this functionality for free. This is a nice bonus.


For the time being, comments are managed by Disqus, a third-party library. I will eventually replace it with another solution, but the timeline is unclear. Considering the amount of data being loaded, if you would like to view comments or post a comment, click on the button below. For more information about why you see this button, take a look at the following article.