It is no secret, it is easy to share a firefox profile. I am running a
dual boot Linux / Windows
and was therefore interested to share my Firefox profile between the
two. But in the process, I actually became interested to be able to
access that profile from my work computer. After all, there are already
extensions to store bookmarks remotely so why not do the same with the
complete profile.
This is the reason why I decided to create a new profile on my
Dropbox. That way, the profile is stored
remotely and synchronized in real-time between my work computer and my
personal computer (both Linux and Windows).
Creating a new profile can be done in two ways. The first is by using
the graphical interface and the second is by modifying the profiles.ini
file directly. I will present both.
Read more...
I wanted to install Linux on my computer (Lenovo X200) but I was a bit
afraid to mess with the partition table due to the fact that there is a
hidden Restore & Recovery partition available at boot up when one press
on the ThinkVantage button.
I did want to keep Windows available as there are a few programs that
can come handy and I didn’t want to mess with the default behavior of
the computer (understand that the ThinkVantage button should still work,
that windows should still be accessible and that I can basically still
use the laptop the way I used to do :-)).
I will explain in the following paragraphs how to reformat the drive
using open source tools and how I created the new partitions for the
X200.
Read more...
In my previous post, I detailed how I
partitioned
the drive of the X200 in order to install Linux. I will now give a few
words about the installation process of Linux Mint 7. The focus of this
post is set on how to keep your boot loader as it is and allow a dual
boot Windows/Linux from the Windows boot loader.
There are only a few things that I changed from the default
installation. The first one concerns the partitioning. Since the drive
is already partitioned, it is necessary to tell the installer which
partitions to use for what. From the picture below, you can easily see
which partitions are used and where they are mounted.
Read more...
Using the method described in my previous article,
you can easily see the benefit to bypass censorship. By using the set up
previously described, you can encrypt all your traffic through the proxy
and therefore appear as if you are only having one long SSH connection.
But in addition, it can be a good idea to configure Firefox to use the
proxy to resolve the DNS requests (in case the DNS server you are using
are “filtered”). To do so, type “about:config” in the adress bar and
change the setting of network.proxy.socks_remote_dns from false to
true as shown below.

If you enjoy Pandora or any content that is
restricted to the USA, it is quite annoying when you cannot access it
because you are out of the country (Ha! Good old Europe).
Fortunately, proxies can help you fix the problem quite easily. I used
to employ GPass. It is an easy
solution to use under Windows but last time I tried to start it, it
couldn’t find any tunnel. There is however an alternative solution to
put in place if you have a web host in the USA with SSH connection:
create your own proxy tunnel.
The process is simple:
- Create a SSH tunnel
- Configure your web browser to use the tunnel.
Read more...
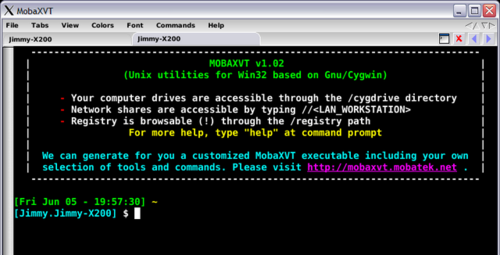
While looking for an easy (and immediate) way to get an SSH console to
windows, I found MobaXVT. It is describe as a “Free portable X server
with Unix/Cygwin utilities”. As the description suggest, it is actually
a Cygwin encapsulation into a nice multi-tab interface that has a
built-in (among other things that I didn’t test) SSH client. Anyway, if
you are just looking to have an SSH client under Windows, this is a
great solution if you are allergic to the Cygwin installation. This is
available for free download at http://mobaxvt.mobatek.net/en/.
Following the article where I explain
how to install a SSH server on the Lacie Edmini,
I will explain how to allow authentication through the use of private /
public key so that you can use the method explained in
another article
to backup your files on your local server.
During the installation of the SSH server,
we didn’t touch anything in the SSH configuration files. The result was
that you could login with the root user you created during the process.
The first thing I want to do is to allow a normal user to use ssh. Doing
so is easy. Just open the /etc/passwd file and modify the line with
the user you want to allow so that it finishes by /bin/bash or
/bin/sh depending on the shell you prefer. Finally, a user allowed to
connect with ssh will have a line look like:
Read more...
In a previous post,
I explained how to make automatic backup on a server using SSH. I was
suggesting that the server was somewhere on the Internet so we didn’t
have to deal with any SSH installation. However, sometimes some data are
to sensible to be stocked somewhere on the Internet so a good idea is to
have your own little server running SSH. In addition, once data are
backed up on your local server you can decide (automatically) which one
of them can be send on a distant server.
I have a Lacie Edmini V2 (ethernet gigabit disk). It is a nice little
network hard drive coming with a Linux OS. It already has a HTTP and FTP
server but unfortunately, no SSH or rsync. Therefore, before being able
to use the backup scripts
we have to install these two services. Fortunately for us, some good
work has already be done by some people. But unfortunately, I’m not as
good with Linux as these guys are so everything they said was not always
really clear. That is mainly the reason why I will try to create a guide
that will be a little bit more explicit. I still assume however that you
have some basic Linux knowledge.
Read more...
Some time ago, I was explaining how to
backup your important files
using rsync and ssh. This solution allowed to transfer some content to
your server in a secure way. Of course, I was using this solution
myself, but I got some problems while using it due to SSH limitations
with my webhost (webhostingbuzz).
Indeed, after 30 minutes of connection, the SSH session was killed and
therefore rsync that was using it got frozen.
After some researches on this Internet, I found some options to give to
the SSH command to maintain a connection open with the server. Different
solutions exist:
Read more...
If you are using a shared webhosting like I do, it can be interesting to
know which websites are located on the same server. Indeed, if you find
your site too slow, it may be because another website is consuming too
much resources. There can as well be some problems if you are sharing
your IP address with some site that are censored abroad. Indeed, if one
of the site of the server is blocked, the IP is probably blocked so you
will not be able to access your own site even though there is nothing to
censor in it. And you will not be able to access your own proxy server.
So here are two interesting links to find it out, but be aware that a
few hundred websites can be located on the same server:
- My IP neighbors
- You get signal